Member data can be loaded into the system either by manual keyboard input, or by way of an import from a payroll extract. This section covers the payroll import process.
Note:
Only the following file extensions are allowable for the payroll load:
- .txt
- .dat
- .prn
- .csv
As there need be no fixed layout to the file, before it can be used initially, the content of the file must be defined in order for the system to be able to interpret it correctly. This is called masking, a process whereby a mask is created, its field properties are set, and the mask generated. Existing masks can be edited (if and when necessary).
If the following fields on the payroll file are not unique, a format error will be generated when the payroll file is imported:
- Membership (Reference number, Plan)
- Membership (Reference number, Employee)
- Employee (Surname, Initials, DOB)
- Employee (IDNumber)
- Employee (PrinEmployer, IDNumber, Surname, Initials, DOB/CoRefNo) - per cycle date
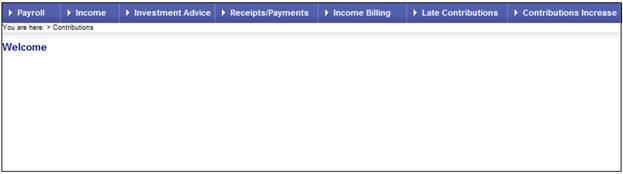
Log in to the system from the Logon page.
Click processes, then click contributions.
Note:
This will only be available to users with PAYROLL or SUPER USER security access.
The Welcome screen will be displayed.
From the main menu on the top, select Payroll. The Options screen will be displayed.

From the System Administration menu, click ![]() alongside IN.pensions System on the sub-menu on the left. Additional options will be displayed.
alongside IN.pensions System on the sub-menu on the left. Additional options will be displayed.

Click Channel Files belowIN.pensions System. The Select Business System and Load Format screen will be displayed.

Click NEXT.
The screen expands.
Note:
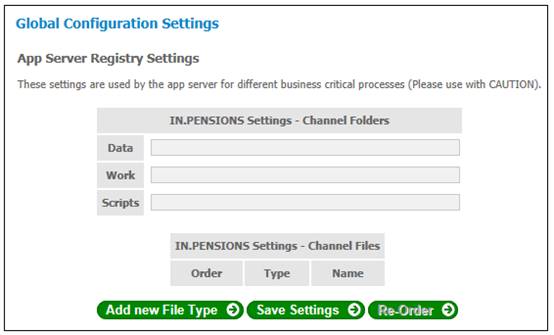
These settings are used by the Application Server for different business critical processes and should therefore be used with caution.
From the System Administration menu, click ![]() alongside IN.pensions System on the sub-menu on the left. Additional options will be displayed.
alongside IN.pensions System on the sub-menu on the left. Additional options will be displayed.
Click Global Settings belowIN.pensions System. The Global Configuration Settings screen will be displayed.

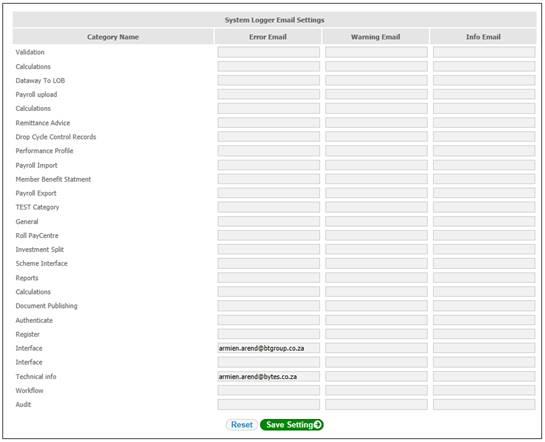
This screen displays a set of global parameters to indicate various upload paths and mailing addresses.
From the System Administration menu, click ![]() alongside IN.pensions System on the sub-menu on the left. Additional options will be displayed.
alongside IN.pensions System on the sub-menu on the left. Additional options will be displayed.
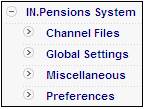
Click Miscellaneous belowIN.pensions System. The Miscellaneous screen will be displayed.
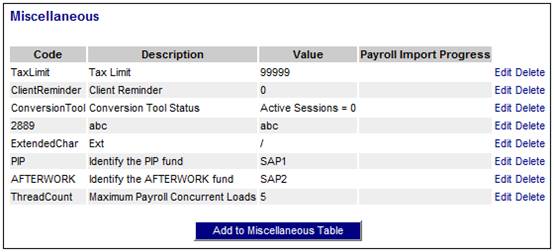
This screen displays miscellaneous parameter tables that may be set.
Note:
If a payroll file is being imported, the Payroll Import Progress column will display the file size and the percentage completed.
Find a parameter table in the Code column of the Miscellaneous screen. Click the Edit hyperlink on the right. The Edit Miscellaneous Value screen will be displayed.

Descriptions of the fields on this screen appear below.
|
Code |
The code identifying the value. |
|
Description |
The text description of the value |
|
Value |
The value. |
Once the table has been edited click SAVE. The Miscellaneous screen will be re-displayed.
To add a new table click ADD TO MISCELLANEOUS TABLE. The New Miscellaneous Value screen will be displayed.
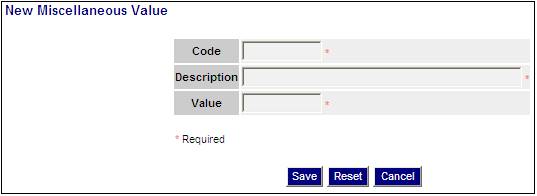
Descriptions of the input fields on this screen appear below.
|
Code |
A code that will identify the value. |
|
Description |
A text description of the value |
|
Value |
The value. |
Note:
The capture of data is mandatory for each field.
Enter the required data, then click SAVE. The Miscellaneous screen will be re-displayed. The value just added will be listed.
To delete a parameter table, click the delete hyperlink on the right of the parameter. A confirmation message will be displayed.
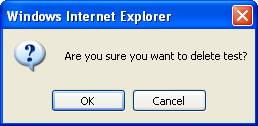
Click CANCEL to cancel the deletion, or click OK to confirm the deletion.
The selected parameter table will be deleted on the Miscellaneous screen.
From the System Administration menu, click ![]() alongside IN.pensions System on the sub-menu on the left. Additional options will be displayed.
alongside IN.pensions System on the sub-menu on the left. Additional options will be displayed.
Click Preferences belowIN.pensions System. The Preferences screen will be displayed.
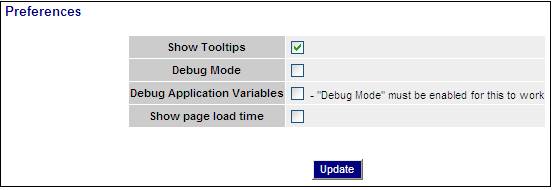
This screen displays various screen display options.
Note:
NOT IN USE.
From the System Administration menu, click ![]() alongside Access Control on the sub-menu on the left. Additional options will be displayed.
alongside Access Control on the sub-menu on the left. Additional options will be displayed.
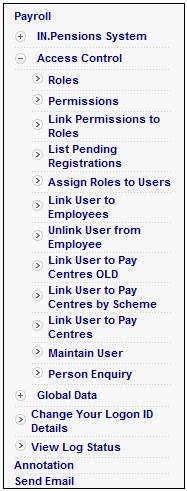
Click Roles below Access Control. The Roles screen will be displayed.
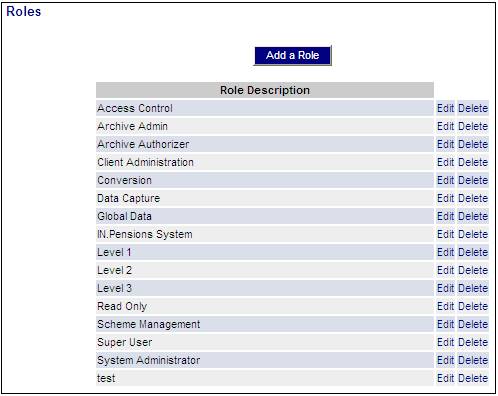
This screen allows the maintenance of all roles for the payroll process.
To maintain an existing role, click the Edit hyperlink alongside a role in the Role Description column. The Edit a Role screen will be displayed.

Amend the text in the Role Description field and click SAVE. The edited role will be displayed on the Roles screen.
To delete a role, click the Delete hyperlink on the right of the role. A confirmation message will be displayed.
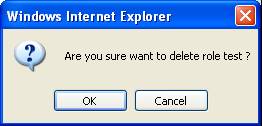
Click CANCEL to cancel the deletion, or click OK to confirm the deletion.
The selected role will be deleted on the Roles screen.
To add a new role, click ADD A ROLE. The Add a Role screen will be displayed.
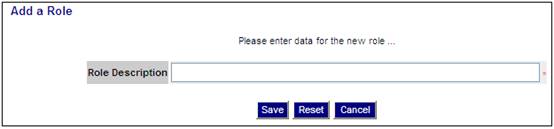
Capture text describing the role in the Role Description field and click SAVE. The new role will be displayed on the Roles screen.
From the System Administration menu, click ![]() alongside Access Control on the sub-menu on the left. Additional options will be displayed.
alongside Access Control on the sub-menu on the left. Additional options will be displayed.
Click Permissions belowAccess Control. The Permissions screen will be displayed.
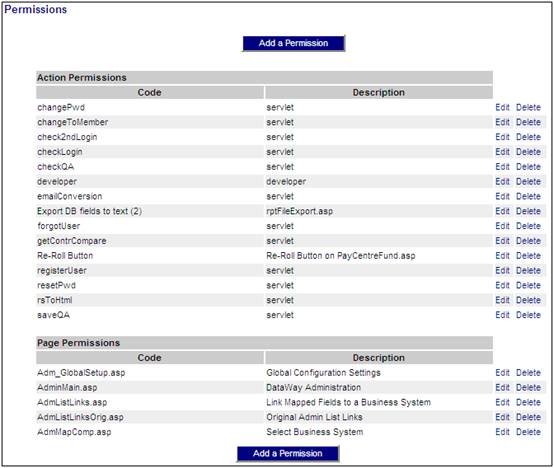
Access (i.e. permissions) to the various payroll web pages is assigned to roles. This screen allows the maintenance of all permissions for the payroll process.
To maintain an existing permission, click the Edit hyperlink alongside a permission in the relevant Permissions column. The Edit a Permission screen will be displayed.
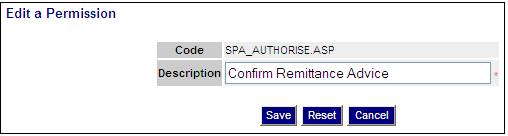
Amend the text in the Code and / or Description fields and click SAVE. The edited permission will be displayed on the Permissions screen.
To delete a permission, click the Delete hyperlink on the right of the permission. A confirmation message will be displayed.
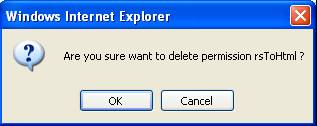
Click CANCEL to cancel the deletion, or click OK to confirm the deletion.
The selected role will be deleted on the Permissions screen.
To add a new permission, click ADD A PERMISSION. The Add a Permission screen will be displayed.
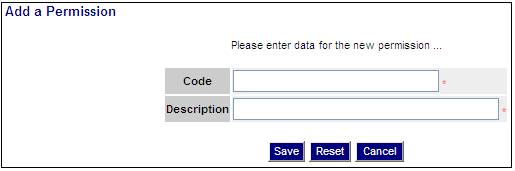
Capture text for the Code and Description fields and click SAVE. The new role will be displayed on the Permissions screen.
From the System Administration menu, click ![]() alongside Access Control on the sub-menu on the left. Additional options will be displayed.
alongside Access Control on the sub-menu on the left. Additional options will be displayed.
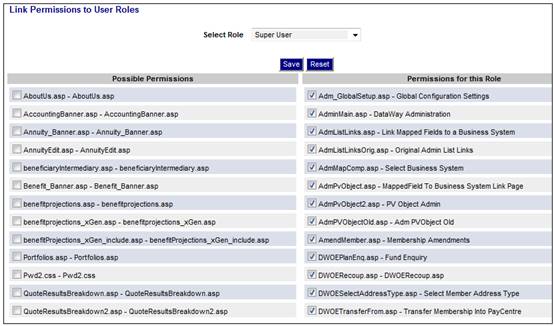
Click Link Permissions to Roles below Access Control. The Permissions screen will be displayed.
For information on this topic refer to
Security
Access
Team Definition
From the System Administration menu, click ![]() alongside Access Control on the sub-menu on the left. Additional options will be displayed.
alongside Access Control on the sub-menu on the left. Additional options will be displayed.
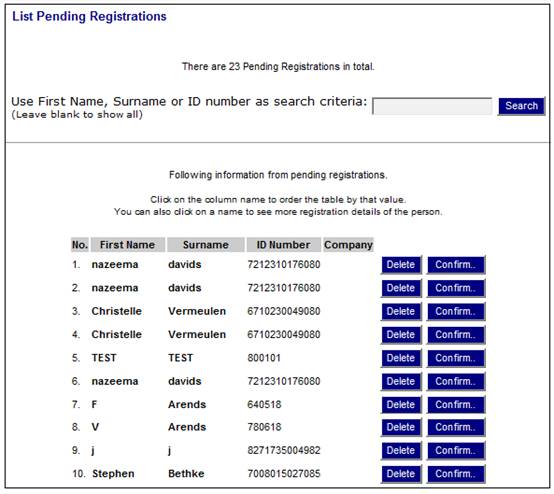
Click List Pending Registrations below Access Control. The List Pending Registrations screen will be displayed.
For information on this topic refer to Pending Registration under
Security
Access
Team Definition
From the System Administration menu, click ![]() alongside Access Control on the sub-menu on the left. Additional options will be displayed.
alongside Access Control on the sub-menu on the left. Additional options will be displayed.
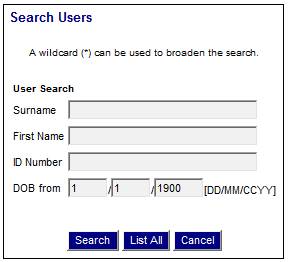
Click Assign Roles to Users below Access Control. The Search Users screen will be displayed.
For information on this topic refer to Functional Security under
Security
Access
Team Definition
From the System Administration menu, click ![]() alongside Access Control on the sub-menu on the left. Additional options will be displayed.
alongside Access Control on the sub-menu on the left. Additional options will be displayed.
Click Link User to Employees below Access Control. The Search Users screen will be displayed.

To select the user, provide as much of the search criteria as possible and click SEARCH. Alternatively, click LIST ALL. A list of all users will be displayed on the lower portion of the screen.

To sort the list by Surname, First Name, ID Number or Date Of Birth, click on the relevant column heading.
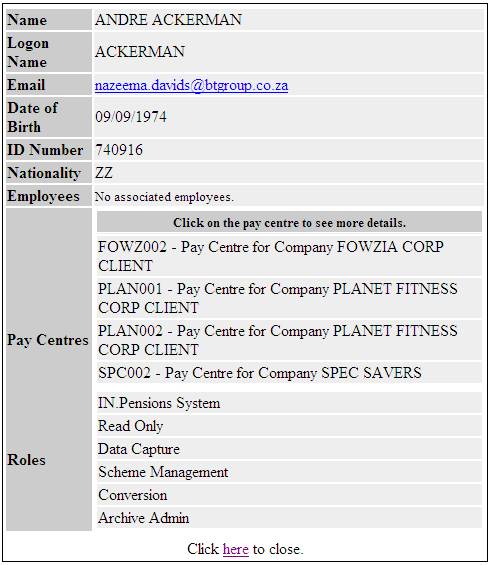
To see more registration details of the user, click on the name in the Surname column. A screen will display the user details.
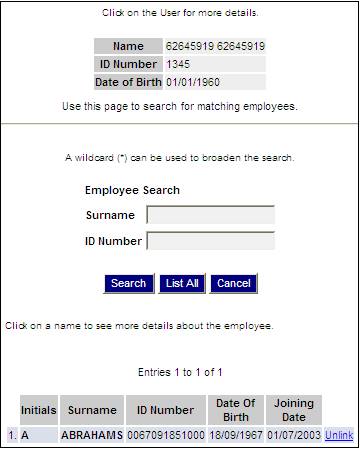
Select the user by clicking the Select hyperlink on the right of the user. The Search Employees known to IN.pensions screen will be displayed.
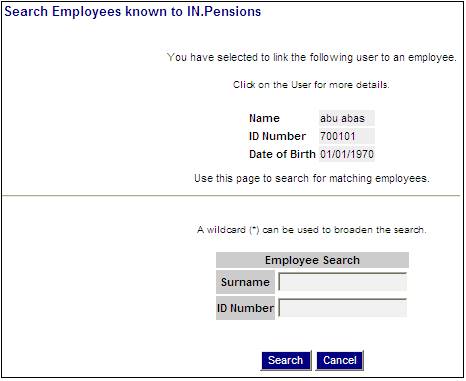
The user that has been selected to be linked to an employee will be displayed in the top section of the screen.
The lower section of the screen allows you to search for a matching employee. Capture a Surname and / or ID Number and click SEARCH. Any matched employees will be displayed at the bottom of the screen.
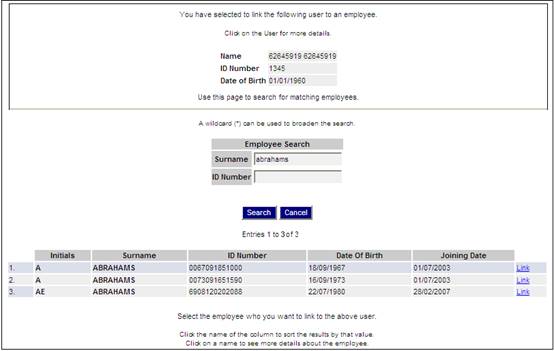
To link the selected user to an employee, select an employee from the bottom of the screen by clicking the Link hyperlink. The Link User to Employee screen will be displayed.
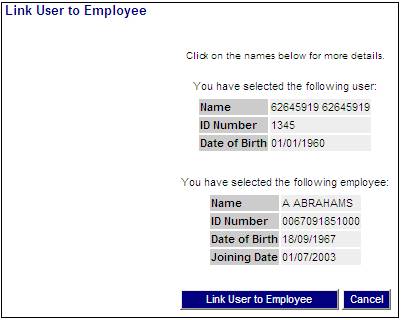
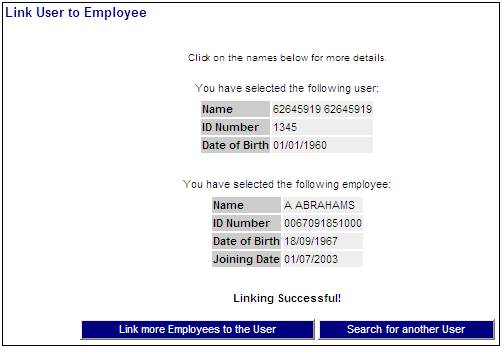
To finalise the linking of the selected user with the selected employee, click LINK USER TO EMPLOYEE. The Link User to Employee screen will display the message Linking Successful! on the screen. The LINK MORE EMPLOYEES TO THE USER and SEARCH FOR ANOTHER USER buttons are displayed on the screen to allow you to perform additional links and or searches.
From the System Administration menu, click ![]() alongside Access Control on the sub-menu on the left. Additional options will be displayed.
alongside Access Control on the sub-menu on the left. Additional options will be displayed.
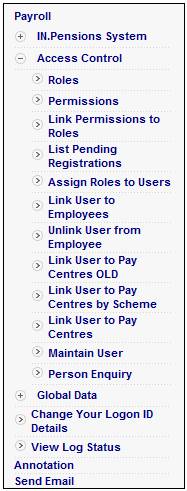
Click Unlink User from Employee below Access Control. The Search Users screen will be displayed.
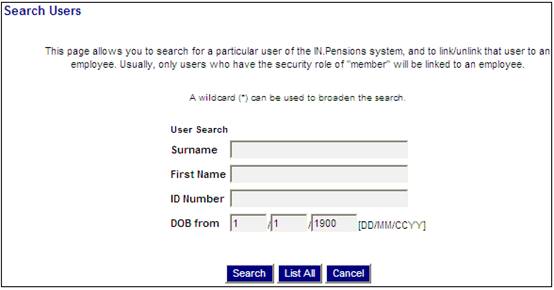
For information on how to Search for Users, refer to the Link User to Employees section above.
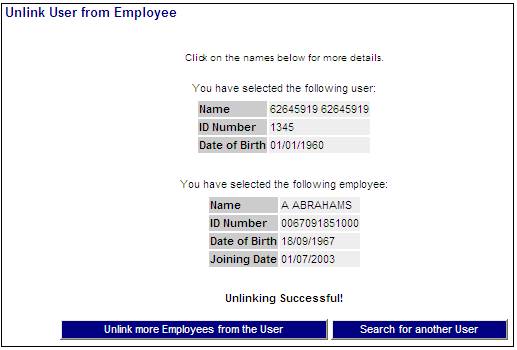
To unlink the selected user from an employee, select the employee from the bottom of the screen by clicking the Unlink hyperlink. The Unlink User from Employee screen will be displayed.
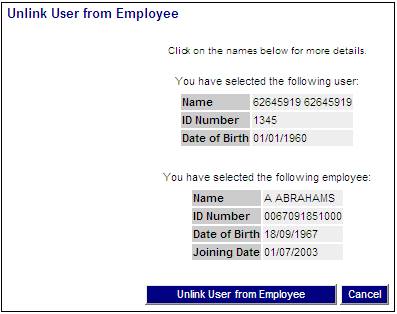
To finalise the unlinking of the selected user with the selected employee, click UNLINK USER FROM EMPLOYEE. The Unlink User from Employee screen will display the message Unlinking Successful! on the screen. The UNLINK MORE EMPLOYEES FROM THE USER and SEARCH FOR ANOTHER USER buttons are displayed on the screen to allow you to perform additional unlinks and or searches.
From the System Administration menu, click ![]() alongside Access Control on the sub-menu on the left. Additional options will be displayed.
alongside Access Control on the sub-menu on the left. Additional options will be displayed.
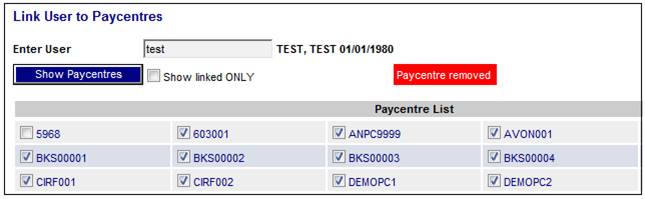
Click Link User to Pay Centres below Access Control.
The Link User to Paycentres screen will be displayed.
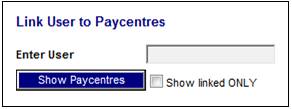
This screen is used to search for the Pay Centres linked to the User.
Capture a User ID in the Enter User field, and click the Show Paycentre button.
A list of paycentres will be displayed.
Note:
Select the Show Linked ONLY tick-box to only display the Pay Centres to which the User is linked.
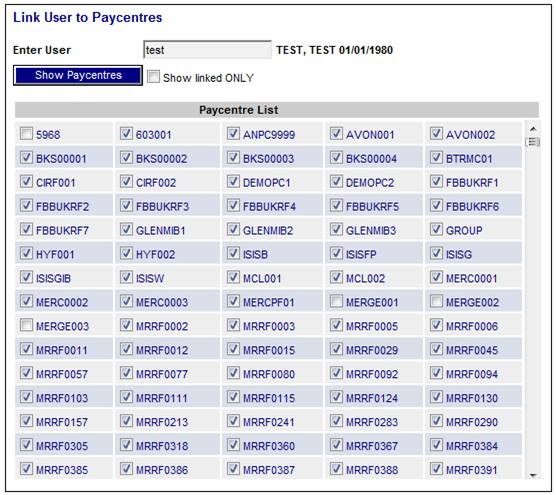
All Paycentres that are ticked are already linked to the User. To add a new Paycentre click the tick- box. A message on the screen will indicate that the Paycentre has been added.
Paycentre added
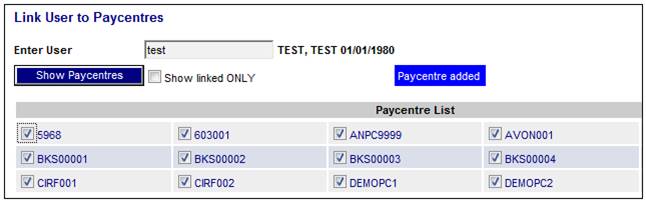
To remove an existing Paycentre that is linked, click the tick- box to remove the tick. A message on the screen will indicate that the Paycentre has been removed.
Paycentre removed
For information on this topic refer to Data Level Security under
Security
Access
Team Definition
From the System Administration menu, click ![]() alongside Access Control on the sub-menu on the left. Additional options will be displayed.
alongside Access Control on the sub-menu on the left. Additional options will be displayed.
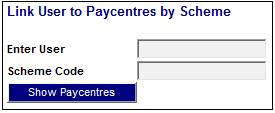
The Link Users to Paycentres by Scheme screen will be displayed.
For information on this topic refer to Data Level Security under
Security
Access
Team Definition
From the System Administration menu, click ![]() alongside Access Control on the sub-menu on the left. Additional options will be displayed.
alongside Access Control on the sub-menu on the left. Additional options will be displayed.
Click Maintain User below Access Control. The Maintain IN.pensions Users screen will be displayed.
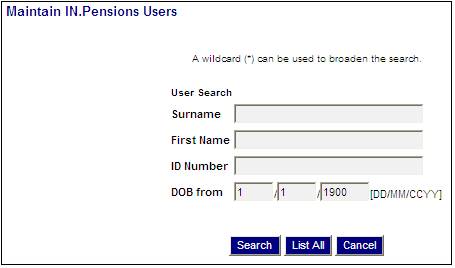
To select the user, provide as much of the search criteria as possible and click SEARCH. Alternatively, click LIST ALL. A list of all users will be displayed on the lower portion of the screen.
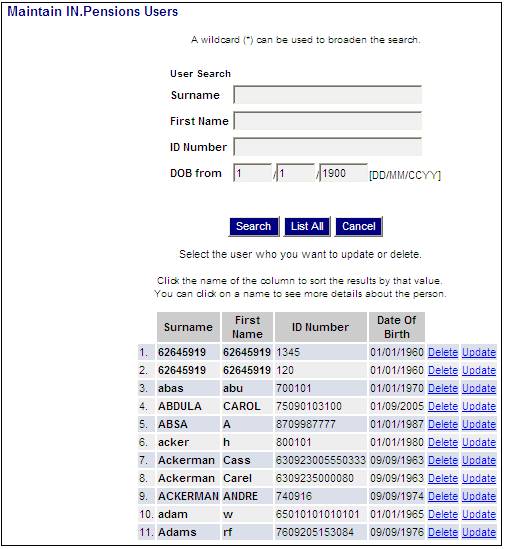
To sort the list by Surname, First Name, ID Number or Date Of Birth, click on the relevant column heading.
To see more registration details of the user, click on the name in the Surname column. A screen will display the user details.
To update the user, click the Update hyperlink on the right for the selected user. The Update an IN.pensions User screen will be displayed.
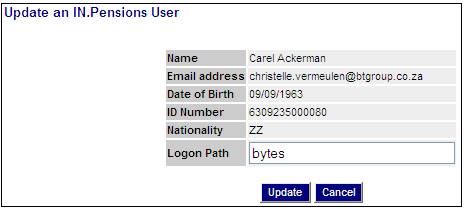
Amend the Logon Path field and click SAVE. A confirmation message will be displayed.
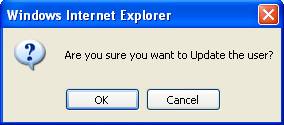
Click CANCEL to cancel the update, or click OK to confirm the update.
The Update an IN.pensions User screen will display a message indicating that the user details have been updated.
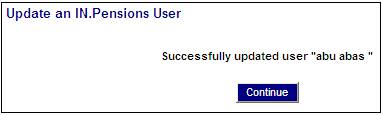
Click CONTINUE to return to a blank Update an IN.pensions User screen.
To delete a user, click the Delete hyperlink on the right of the selected user. The Delete an IN.pensions User screen will be displayed.
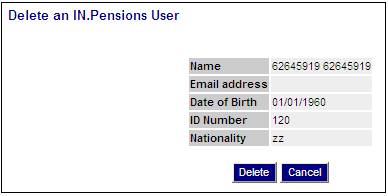
To confirm deletion of the user, click DELETE. A confirmation message will be displayed.

Click CANCEL to cancel the deletion, or click OK to confirm the deletion. A confirmation message will be displayed.
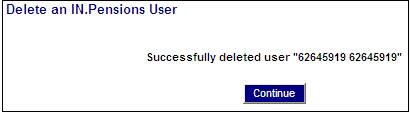
Click CONTINUE to return to a blank Update an IN.pensions User screen.
From the System Administration menu, click ![]() alongside Access Control on the sub-menu on the left. Additional options will be displayed.
alongside Access Control on the sub-menu on the left. Additional options will be displayed.
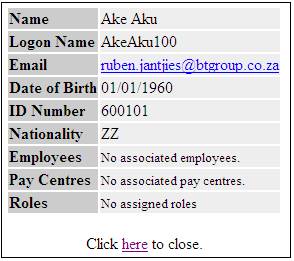
Click Person Enquiry below Access Control. The Person Selection Criteria screen will be displayed.
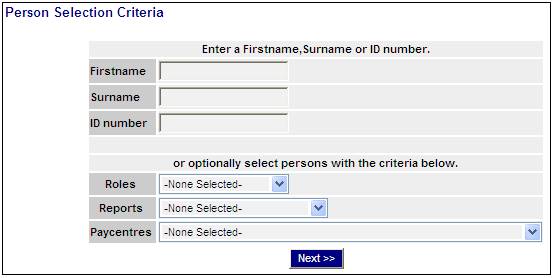
Capture or select data for one or more items on this screen in order to enquire on a person, as follows:
|
Firstname |
The first name of a person |
|
Surname |
The surname of a person |
|
ID Number |
The ID number of a person |
|
Roles |
Select a role from the drop-down list |
|
Reports |
Select a report from the drop-down list |
|
Paycentres |
Select a pay centre from the drop-down list. |
Once data has been captured, click NEXT. The Person Details screen will be displayed.
If no records were found, a message will be displayed.
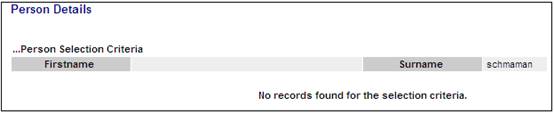
If data was found, the details will be displayed on the screen.
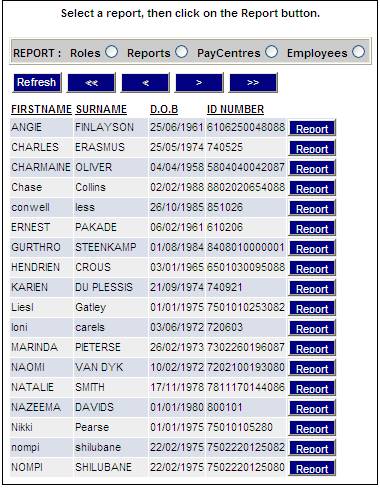
Select a report by clicking the appropriate radio button.
![]()
Click REPORT on the right alongside the required person. The report details will be displayed at the bottom of the screen.

From the System Administration menu, click ![]() alongside Global Data on the sub-menu on the left. Additional options will be displayed.
alongside Global Data on the sub-menu on the left. Additional options will be displayed.
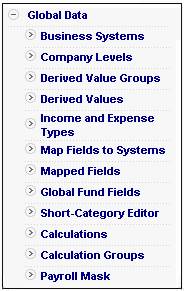
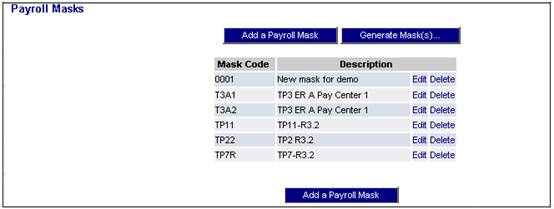
Click Payroll Mask belowGlobal Data. The Payroll Masks screen will be displayed.
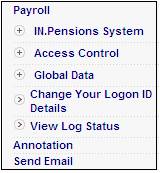
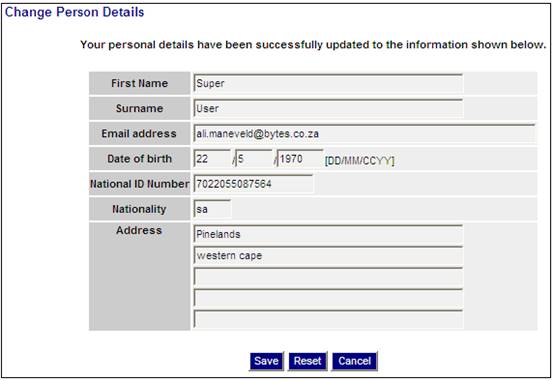
From the System Administration menu, click Change Your Logon ID Details on the sub-menu on the left.
The Change Person Details screen will be displayed.
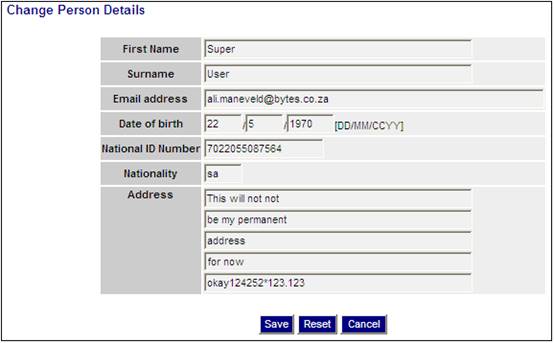
Update details on the screen and click SAVE. The system will display a message confirming that the details have been changed.
From the System Administration menu, click View Log Status on the sub-menu on the left.
The View Logs screen will be displayed.

This screen displays log messages for all processes.
Some logs have a ![]() in the left column. Click on this to expand the message to display additional details.
in the left column. Click on this to expand the message to display additional details.
![]()